
Snowflake and Azure Data Factory: A Powerful Duo!

Based on the QuickStart developed by Snowflake, let's go through some key concepts on how to use ADF to create a data pipeline and analyze this data in Snowflake.

What will we do?
Deploy an Azure SQL Database
Set up ADF
Copy data and use Data Flow to insert data into Snowflake
First of all, we need to create our Database in Snowflake and our tables.
It's essential to have knowledge of SQL to complete this step.
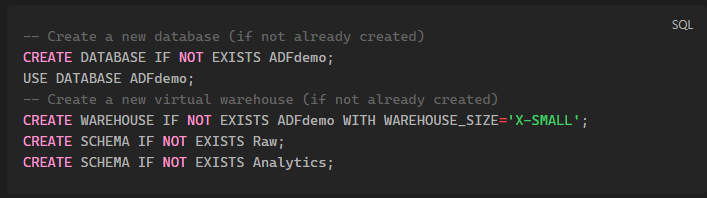
Creating our Database, Warehouse, and Schemas:
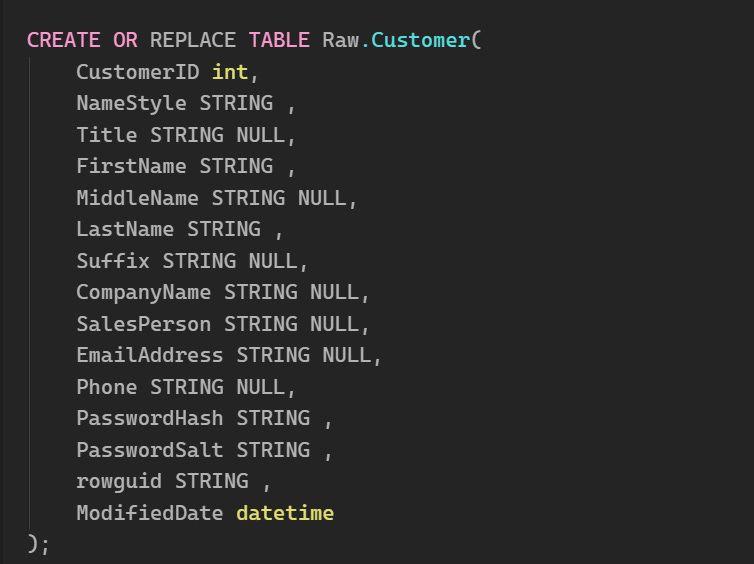
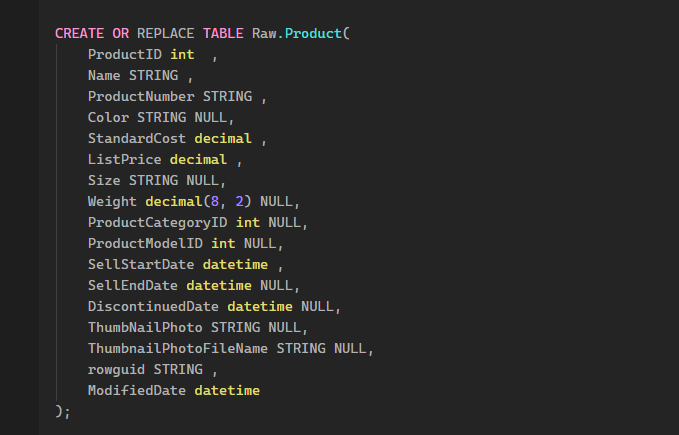
Creating Our RAW Tables
Creating the Analytics Table
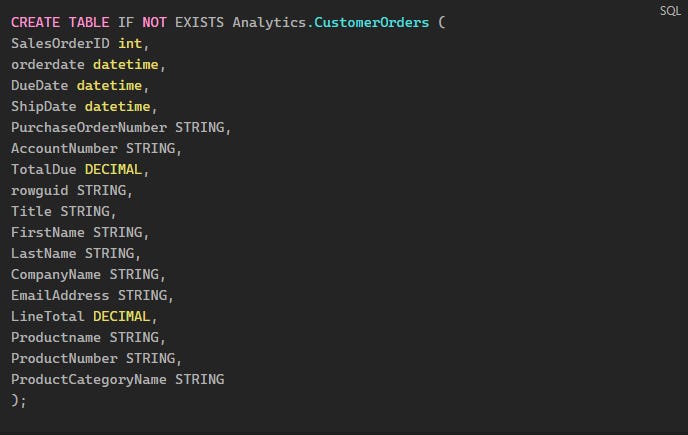
In a real scenario, this would be the table shared with the business team so they can perform the necessary analysis of the metrics.
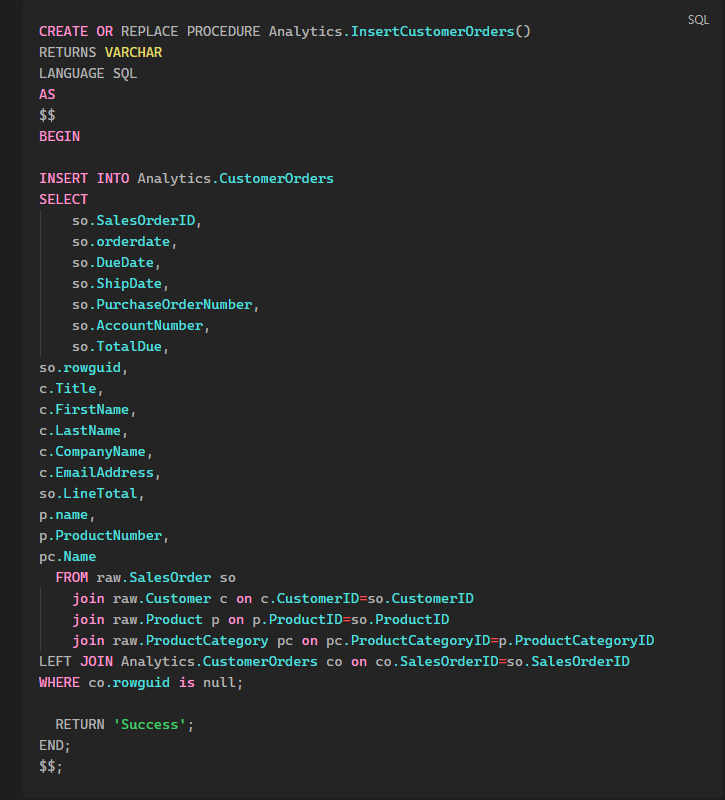
To populate this table, we’ll create a PROCEDURE that will basically perform a join between the tables in RAW and generate a table that’s already complete with all the needed data.
With these steps, our Snowflake environment is ready to receive data from Azure!
Azure
Now, all our processes will take place in Azure.
Our first step here will be to create a SQL Database using the sample data that Azure provides.
To do this, just follow these steps:
Here’s the translation:
Creating the Azure SQL Instance:
Access the Azure portal:
Go to the Azure portal and search for Azure SQL in the Marketplace.Select:
Choose the Create option, then select Single Database.Database Configuration:
Database Name: Name it
ADFdemo.Server: Create a new server with a unique name. Enable SQL authentication and provide an admin login name and password.
Network Settings:
In Networking, choose the connectivity method as Public Endpoint.
Enable the options to allow Azure services and add the current client IP.
Additional Settings:
In Additional Settings, select the option to use existing data and choose the AdventureWorks sample database.
Completion:
After configuring these settings, click Create to finalize the creation of the instance and include the sample database.
Now we need to create and configure our ADF (Azure Data Factory), this is where the magic happens.
To create it, just follow these steps:
Go back to the Azure Marketplace:
After configuring Azure SQL, you need to return to the Azure Marketplace, which is Microsoft's platform where you can search for and create resources.
Search for "Data Factory":
Use the search bar in the Marketplace to look for the service called Azure Data Factory.
Creating the Data Factory Instance:
Select the Create option to start the process of creating a new Data Factory instance.
Provide a name for the instance, choose your preferred region (where the resources will be hosted), and make sure the version selected is V2 (the latest and most stable version of Azure Data Factory).
Default Settings:
Use the default settings provided by the platform during the creation process, without needing to manually adjust other parameters.
After following these steps, your Azure Data Factory instance will be ready for use, allowing you to create data pipelines and integrate with other sources, such as the Azure SQL database we set up earlier.
Now we need to create a Container to store our staging data. To do this:
Using Blob Storage in Azure Data Factory (ADF):
ADF uses Blob Storage as a staging area (intermediary) during data movement. When transferring or transforming data, ADF first uploads the data to a container in Blob Storage for processing.
Creating a Storage Account:
Go to the Azure Marketplace and search for Storage Account.
Click Create to begin creating a new storage account.
Set a Unique Name:
Give your storage account a unique name (this name must be unique in Azure because it will be part of the URL to access the data).
Keep Default Settings:
During creation, keep all the default settings (such as redundancy type, performance tier, etc.) and click Create to finalize the account creation.
Note: For real and sensitive projects, it's recommended to follow your organization's best security practices to protect the data and avoid making the data public.
Access the Resource:
Once the storage account is created, select Go to Resource to access the new account.
Create a Container:
In the storage account panel, on the left menu, select Containers, where you’ll create a space to store the data.
Create a new container and name it
adfdemo. This container will be used by ADF to store data during the data movement and transformation processes.
Generate the SAS Token:
Go to your storage account panel and select Shared Access Signature on the left menu.
Configure Permissions:
Ensure that all resource types (containers, blobs, tables, etc.) are enabled for the SAS. This ensures that ADF has the proper permissions to access and manipulate the data in the container.
Set the Expiration Date:
Set an expiration date for the token. The validity period should be long enough to ensure that the process we’re creating is completed without issues. If the SAS expires before the project ends, ADF will lose access to the container.
Generate the SAS Token and Connection String:
After configuring the permissions and expiration date, click to generate the SAS token and the connection string that will be used by ADF to access the container.
Copy and Save the SAS Token:
Important: Once the SAS token is generated, you need to copy and save it immediately.
Configuring Linked Services
Linked Services act as a connection string between data sources or destinations that you want to interact with.
Today, we will create 3 Linked Services: one to connect to Blob Storage, another to connect to Azure SQL, and another to connect to Snowflake.
Linked Service for Azure SQL Database:
Create Linked Service:
In Azure Data Factory, select the option Create Linked Services. These linked services connect ADF to external data sources, such as Azure SQL Database.
Select Azure SQL Database:
When creating the Linked Service, choose Azure SQL Database as the type of service you want to connect to.
Click Continue to proceed to the next configurations.
Add Connection Information:
Provide a Name for the Linked Service (something that clearly describes the connection, like "SQLDatabaseConnection").
Select the subscription information that corresponds to the Azure SQL database you set up earlier (details like the Azure subscription and database instance).
SQL Authentication:
Enter the username and password for SQL authentication that you configured earlier when creating the database.
Test Connection:
Before finishing, click Test connection to ensure that ADF can successfully connect to the database.
Create the Linked Service:
If the connection is successful, click Create to finalize the creation of the linked service.
This process allows ADF to access your database in Azure SQL, enabling you to move, transform, and manipulate data within the ADF pipeline.
Linked Service for Azure Blob Storage:
Create Linked Service:
In Azure Data Factory, select the option Create Linked Services.
This time, choose Azure Blob Storage as the type of service you want to connect ADF to.
Click Continue to proceed.
Define the Authentication Type:
For authentication, select the SAS URI option (Shared Access Signature). The SAS URI allows ADF to access Blob Storage with temporary and controlled permissions.
Enter SAS Token Information:
Enter the SAS URI that you generated in the previous steps. The SAS URI contains the base URL of the Blob Storage and the authentication token.
Base URL:
The text indicates that the URL should only be the base URL of the Blob Storage, meaning something like:
AccountName.blob.core.windows.netDo not include the container or the authentication token in the base URL, as the SAS token will be used separately to control access.
Linked Service for Snowflake:
Create Linked Service:
In Azure Data Factory, select the option Create Linked Services.
This time, choose Snowflake as the type of service you want to connect ADF to.
Click Continue to proceed.
Fill in Account Details:
Fill in the information for your Snowflake account:
Account Name: The format of the Snowflake account name follows a pattern, which is usually something like:
account_name.region.cloud_provider
Whereaccount_nameis the name of your account,regionis the region where it is located, andcloud_provider(for example,aws,azure) indicates the cloud provider. Make sure to use the correct format to ensure that ADF connects properly to your Snowflake instance.
Database and Warehouse:
Set both the Database and Warehouse to
ADFDEMO, as indicated in the text.Database: The database in Snowflake where the data you want to manipulate is stored.
Warehouse: A warehouse is essentially the computing environment in Snowflake that processes your queries and data workloads.
Now that the connections have been created, we can start developing our pipeline.
To do this, let’s continue in ADF and now create the Source and Sink Datasets.
This is Data Engineering at its core! Fetching data from a source and transporting it to a destination, performing the necessary transformations before or after loading it to the destination (ETL or ELT; I’ll talk about that another day).
Creating Source Datasets:
For the first source dataset, select Azure SQL Database.
Set the Table Name as
SalesLT.Product.
Repeat this process to create the following source datasets:
AzureSQL_ProductCategory (Table:
SalesLT.ProductCategory)AzureSQL_Customer (Table:
SalesLT.Customer)AzureSQL_SalesOrderHeader (Table:
SalesLT.SalesOrderHeader)AzureSQL_SalesOrderDetail (Table:
SalesLT.SalesOrderDetail)
Creating Sink Datasets:
Now, create the sink datasets, which are the destinations for the data that will go to Snowflake.
For this, select Snowflake when creating the new dataset.
Name the dataset Snowflake_Product.
Set the Linked Service to the one you created earlier for Snowflake.
Set the Table Name as
Raw.Product(the destination in Snowflake).
Repeat the process for the following sink datasets:
Snowflake_ProductCategory (Table:
Raw.ProductCategory)Snowflake_Customer (Table:
Raw.Customer)Snowflake_SalesOrderHeader (Table:
Raw.SalesOrderHeader)Snowflake_SalesOrderDetail (Table:
Raw.SalesOrderDetail)
We have created 5 source datasets that represent the tables in Azure SQL Database and 5 sink datasets for the tables in Snowflake. These datasets will be used to move data from the SalesLT tables in SQL to the corresponding tables in the Raw schema in Snowflake.
Creating the Pipeline
Now let's effectively connect everything and send the data to Snowflake.
I really like ADF because it is an extremely visual tool. By the end of our process, we should have something like this:
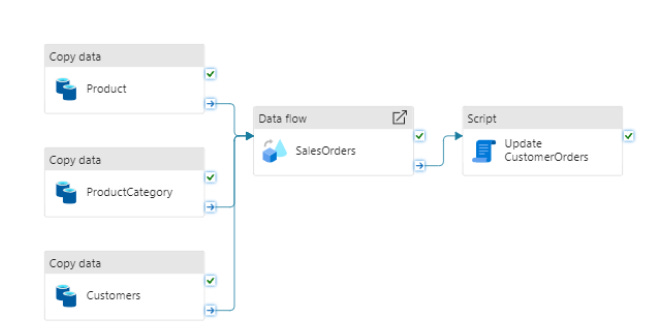
Configure the Copy Data Activity:
The first activity in the pipeline will be a Copy Data Activity, which will copy the data directly from the source (Azure SQL) to the destination (Snowflake).
In the Move and Transform menu, select the Copy Data activity.
2. Name the Activity:
Name the Copy Data activity as Product, as it will be copying the product table.
3. Configure the Source:
Go to the Source tab and select the source dataset you created earlier, which is AzureSQL_Product, representing the
SalesLT.Producttable from Azure SQL.
4. Configure the Sink:
Go to the Sink tab and select the destination dataset, Snowflake_Product, which represents the
Raw.Producttable in Snowflake.In the pre-copy script field, insert the following SQL command:
Truncate table Raw.Product;This command truncates the Raw.Product table, meaning it clears all old data from the table before loading the new data each time the pipeline is executed.
5. Enable Staging:
In the Settings tab, enable the Enable Staging option.
Set the Staging account as the Blob Storage you configured earlier. This means ADF will use Blob Storage as a temporary location during the data movement process.
6. Create More Copy Activities:
To optimize the work, you can copy and paste the Copy Data activity you created and make adjustments for the other tables.
First Copied Activity:
Update the name to ProductCategory.
In the Source, select the dataset AzureSQL_ProductCategory (table
SalesLT.ProductCategory).In the Sink, select the dataset Snowflake_ProductCategory.
Update the pre-copy command to:
Truncate table Raw.ProductCategory;Second Copied Activity:
Update the name to Customer.
In the Source, select the dataset AzureSQL_Customer (table
SalesLT.Customer).In the Sink, select the dataset Snowflake_Customer.
Update the pre-copy command to:
Truncate table Raw.Customer;We configured a pipeline in Azure Data Factory with three Copy Data activities that move data from the SalesLT.Product, SalesLT.ProductCategory, and SalesLT.Customer tables from the Azure SQL Database to the Raw.Product, Raw.ProductCategory, and Raw.Customer tables in Snowflake.
Each time data is loaded, the tables in Snowflake are truncated (cleared) before receiving the new data.
Data Flow
Now we will add a Data Flow to perform transformations on the data. Specifically, we will join the Sales Order Header and Sales Order Detail tables into a single table in Snowflake. To do this:
1. Add a Data Flow Activity:
Create a new Data Flow Activity in the pipeline.
Name the activity SalesOrders.
2. Configure the Data Flow:
In Settings, select New Data Flow.
Name the Data Flow, such as SalesOrder DataFlow.
At the top, select Data Flow Debug and click OK. This creates a Spark cluster for debugging, allowing you to view the data while performing transformations.
3. Add Data Sources:
Source 1: Add a data source and name the output stream SalesOrderHeader.
Select the dataset AzureSQL_SalesOrderHeader, which represents the sales order header table (
SalesLT.SalesOrderHeader) in Azure SQL.In Projection, click on Import projection to load the schema of the table.
Source 2: Add a second data source and name the output stream SalesOrderDetail.
Select the dataset AzureSQL_SalesOrderDetail, which represents the sales order detail table (
SalesLT.SalesOrderDetail) in Azure SQL.In Projection, click on Import projection to load the schema of the table.
4. Add a Join Activity:
Next to the SalesOrderHeader activity, click the small "+" button and add a Join activity.
Configure the Join:
Set the left stream as SalesOrderHeader.
Set the right stream as SalesOrderDetail.
Set the join condition on both sides as SalesOrderID, which is the common field between the two tables.
5. Add a Select Activity:
After the join activity, click the "+" button and add a Select activity.
The Select activity is used to choose the fields you want to keep after the join. Since some columns in both tables have the same name, check the option skip duplicate input columns. This will ensure that only the columns from the SalesOrderHeader table are kept when there are duplicates.
6. Add a Sink Activity:
After the select activity, add a Sink activity where the transformed data will be stored.
Name the activity Snowflake.
Set the destination dataset as Snowflake_SalesOrder, which represents the orders table in Snowflake.
In Mapping, uncheck the option Auto Mapping. This ensures that the field mapping is done according to the fields in the Select activity.
If the mapping doesn’t look correct, you can open the dataset and click on Import schema to update the metadata.
In summary, we are configuring a data flow in Azure Data Factory to combine data from two tables (SalesOrderHeader and SalesOrderDetail) into a single table in Snowflake. This process involves:
Loading the data from both source tables.
Performing a join based on the SalesOrderID field.
Selecting the desired columns (avoiding duplication).
Loading the resulting data into the destination table in Snowflake (
Snowflake_SalesOrder).
This is a classic example of how to move and transform data between sources and destinations using an ETL process.
We're almost at the end. Now let's create a Script Activity to push the data transformation to Snowflake, thus utilizing its computational power.
To do this:
Add a Script Activity:
Within the pipeline in Azure Data Factory, navigate to General Activities.
Add a Script Activity, which will allow the execution of SQL or Python scripts directly in Snowflake.
Name the activity Update CustomerOrders.
Configure the Script:
In the Settings tab, add a SQL query that will be executed in Snowflake.
The query is:
CALL Analytics.InsertCustomerOrders();This line executes the stored procedure in Snowflake called InsertCustomerOrders that we created earlier.
Add a Trigger:
At the top of the pipeline page, click on Add Trigger.
Select the New/Edit option. This will allow you to create or edit a trigger for executing the pipeline.
Configure the Recurrence:
Set the Recurrence to Every 1 Day. This means that the pipeline will automatically run once a day.
This configuration automates the process, eliminating the need to manually execute the pipeline every time you want to move or transform data.
Set the Execution Time:
Choose the time that works best for your testing or operation. This can be adjusted based on when you want the pipeline to run, for example, during the night when there is less load on the system.
By adding a trigger in ADF, you automate the execution of the pipeline, configuring it to run daily. This is useful for regular and automated workloads, such as data ingestion, transformations, and data movement, ensuring that the pipeline runs without manual intervention. You can adjust the timing as needed for testing or ongoing operations.
Great, now we are all set!
If everything went well, we should return to Snowflake, and the tables created earlier should be loaded.